- Quick Start
- Test Monitoring
- LM GitHub App
- LM Dashboard
- REST API
- FAQ
- Using the API via CLI
- Administration Guide
- Workflow Testing RO-crate specification
- Index
LifeMonitor CLI
You can use LifeMonitor from the command line with the restish client for openAPIs. Follow this documentation to walk you through the steps to get you going.
Install restish
Refer to the restish documentation for up-to-date and complete instructions. For convenience, we summarize the installation steps here. You have three options:
Grab a binary release for your platform:
$ wget https://github.com/danielgtaylor/restish/releases/download/v0.7.0/restish-0.7.0-linux-x86_64.tar.gz
$ tar xzf restish-0.7.0-linux-x86_64.tar.gz
$ ./restish --version
restish version 0.7.0
Use Go get:
$ go get -u github.com/danielgtaylor/restish
Use Homebrew:
# Add the tap
$ brew tap danielgtaylor/restish

# Install the executable
$ brew install restish
Add Restish as a LifeMonitor OAuth2 client
Instructions on how to configure Restish are provided in its documentation.
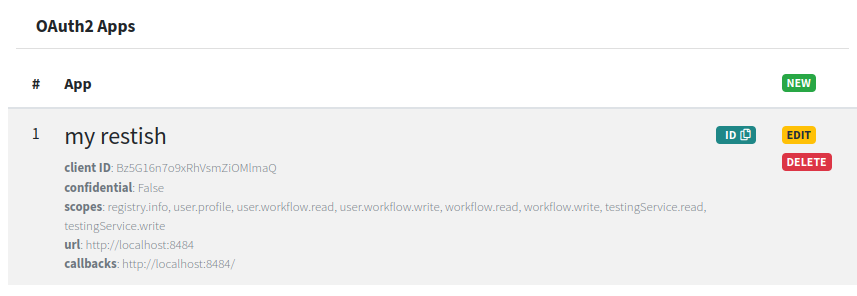
To add restish as a LifeMonitor client, start by logging into the LifeMonitor web interface.
Select the OAuth Apps list. Click on the New button on the right of the list to add a new application.
Assuming you’re using Restish from your computer, configure the new client as follows (make sure you include the trailing slash in the URIs):
- Client name: whatever you like, e.g., RestishClient.
- Client URI:
http://localhost:8484/ - Client Redirect URIs:
http://localhost:8484/ - Allowed scopes: add them all, or be more selective according to your needs
- Client Type:
Off(i.e., not confidential)
Save the configuration. You should see the newly configured application in the OAuth App list.
Configure Restish to work with the LifeMonitor API
Invoke the restish configure command with the LifeMonitor API URL:
$ restish api configure lm https://api.lifemonitor.eu
The Restish wizard will guide you through configuration procedure. Copy values
shown between angle brackets < > from the OAuth App you created in
LifeMonitor (hit Return to leave client_secret unset):
? Select option Edit profile default
? Select option for profile `default` Setup auth
? API auth type oauth-authorization-code
? Auth parameter client_id <COPY THE "client ID">
? Auth parameter client_secret (optional)
? Auth parameter authorize_url https://api.lifemonitor.eu/oauth2/authorize
? Auth parameter token_url https://api.lifemonitor.eu/oauth2/token
? Auth parameter scopes (optional) <COPY THE "scopes">
? Add additional auth param? No
? Select option for profile `default` Finished with profile
? Select option Save and exit
Now you should be ready to go. Test things out: try to query your user profile:
$ restish lm show-current-user-profile
Restish should open your browser and direct you to the LifeMonitor application authorization page.
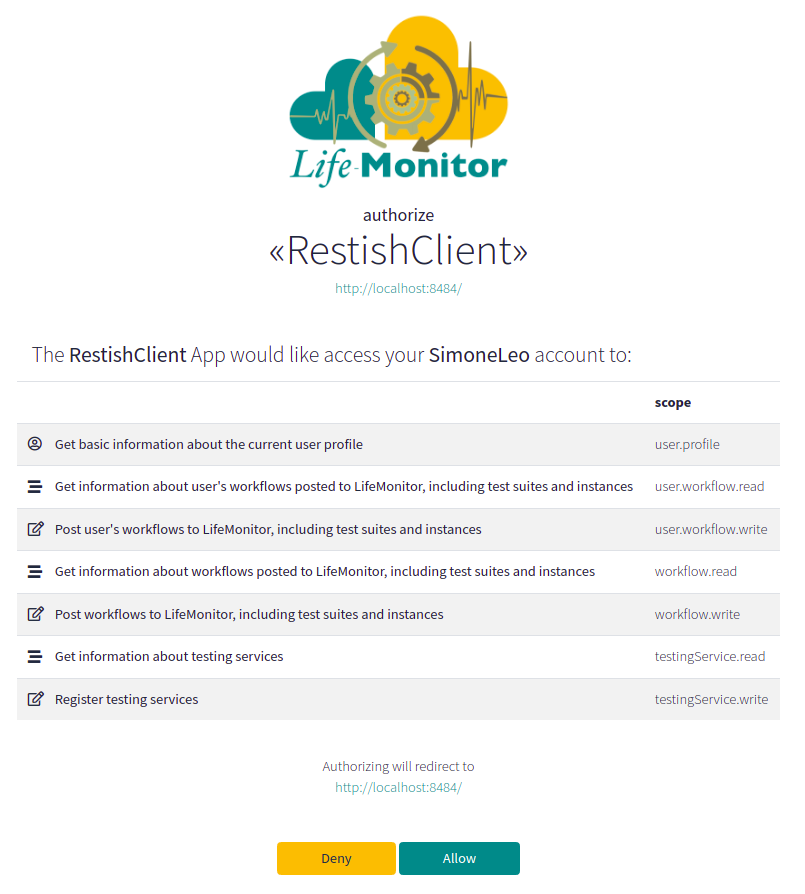
Hit “Allow” to authorize Restish to access LifeMonitor for you, then move back to the console. You should now see the output of your command:
HTTP/1.1 200 OK
Access-Control-Allow-Origin: *
Cache-Control: private
Content-Length: 664
Content-Type: application/json
Date: Mon, 03 May 2021 16:19:52 GMT
Server: nginx
Set-Cookie: session=.eJwlzjkOwjAQQNG7uKbwLLZncpnInkXQJqRC3J1ItP8371P2POJ8lu19XPEo-8vLVlK4YjVYSObQAHhRVeE-OoFOIE4EbLkUxYDvlJ1mj5i-6siaU6J3uj9FdYsp1mkosTAaWfJsyhq6BNQJRRs0dFcO5QoB5YZcZxx_DZfvD0-SLiM.YJAiqA.UZu2x0Zrc7p6LQrgQt-OwTsL8ic; HttpOnly; Path=/
a4f14707e508ff4121052c83aea9e62e=a4c568703bcc20346735ea36d21623e8; path=/; HttpOnly; Secure
Vary: Cookie
X-Frame-Options: SAMEORIGIN

{
  id: 43838
  identities: {
    github: {
      email: ""
      name: "My name"
      picture: "https://avatars.githubusercontent.com/u/1029365?v=4"
      profile: "https://github.com/myname"
      provider: {
        name: "github"
        type: "oauth2_identity_provider"
        uri: "https://api.github.com/"
        userinfo_endpoint: "https://api.github.com/user"
      }
      sub: "5029316"
      username: "myname"
    }
  }
  meta: {
    api_version: "0.2.0-beta2"
    base_url: "https://api.lifemonitor.eu"
    resource: "/users/current"
  }
  username: "myname"
}
What can you do?
The restish client will give you access to all API calls.
To see all the available calls:
$ restish lm
*Workflow sustainability service*

LifeMonitor aims to facilitate the sharing, execution and monitoring of
workflow tests over time, ensuring that deviations from the workflow's
correct operation are detected and communicated to the workflow authors so
that they might be solved, thus extending the useful life of the workflow.

LifeMonitor is being developed as part of the [EOSC-Life project](https://www.eosc-life.eu/).

Usage:
  restish lm [flags]
  restish lm [command]

Available Commands:
  get-registry-users                 List users
  instances-builds-get-by-id         Get a test instance build
  instances-builds-get-logs          Get test instance build logs
  instances-delete-by-id             Delete a test instance
  instances-get-builds               Get the latest test instance builds
  instances-get-by-id                Get a test instance
  registry-user-workflows-get        List workflows for a user
  registry-user-workflows-post       Submit workflow for a user
....
To see what the commands do, remember that you can refer to the API specs at https://api.lifemonitor.eu/static/apidocs.html.
Example:
$ restish lm workflows-get -q status=false
HTTP/1.1 200 OK
Access-Control-Allow-Origin: *
Cache-Control: private
Content-Length: 313
Content-Type: application/json
Date: Mon, 10 May 2021 10:27:56 GMT
Server: nginx
Set-Cookie: session=.eJwlzkEOwyAMBdG7sO7C5GNjcpkIY6N2mzSrqncvUg8wevNJxzzjeqb9fd7xSMfL054G5xgSbJuIh4G9W6YNVVS0eQlVIqYGtpCuA92gAKxPEdQ-4ARbKXG2GaylRRgV8pa55I4pJih1lkVooxYLNG5RsmeHpjVyX3H-byDp-wPeaS8Q.YJkKrA.P2zsIG5OnkaFtghFB4OGWeHEwko; HttpOnly; Path=/
9544ac48d9c55647d010c525a5be4146=ba378a3cbd4a1f5f26a99edeab93fb3e; path=/; HttpOnly; Secure
Vary: Cookie
X-Frame-Options: SAMEORIGIN

{
  items: [
    {
      latest_version: "1"
      name: "sort-and-change-case-travis"
      uuid: "bc435030-6e1e-0139-2dea-005056ab5db4"
    }
  ]
  meta: {
    api_version: "0.2.0-beta2"
    base_url: "https://api-lifemonitor-test.rahtiapp.fi"
    resource: "/workflows?status=false"
  }
}
Now that you have configured your client you can register your workflows.