- Quick Start
- Test Monitoring
- LM GitHub App
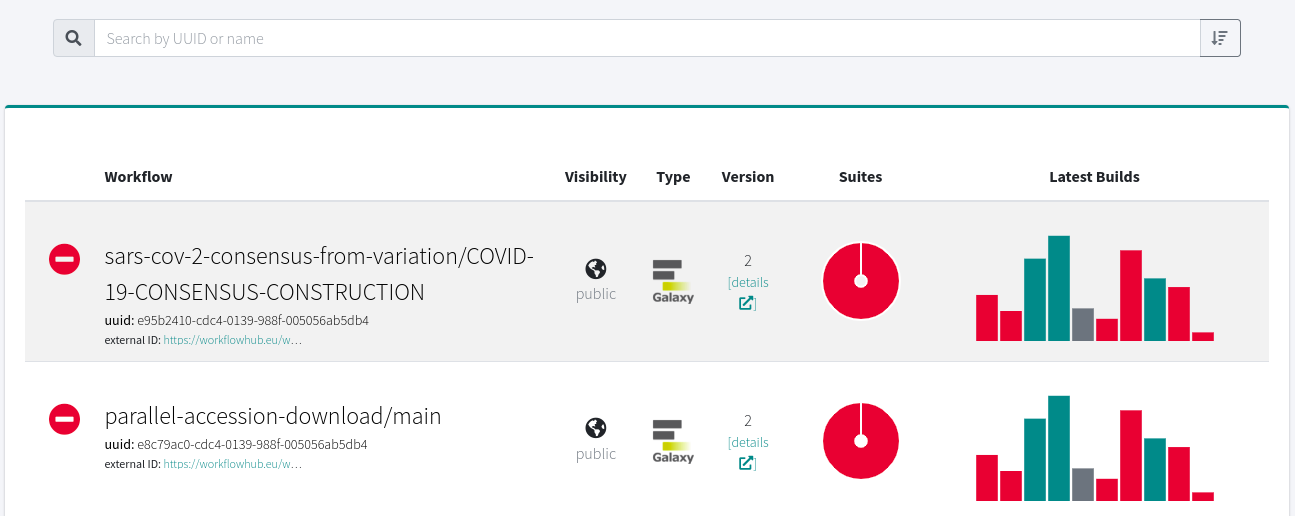
- LM Dashboard
- REST API
- FAQ
- Using the API via CLI
- Administration Guide
- Workflow Testing RO-crate specification
- Index
LifeMonitor Test Monitoring
The LifeMonitor service can be configured to:
- monitor the status of the automated tests you have configured to run on your workflow;
- trigger the execution of those tests if too much time has passed since their previous execution.
Thus, using LifeMonitor implies that you have created tests for your workflow and that you have created an automated pipeline to execute them using a compatible testing service. If you’re not this far yet with your workflow, you can have a look at our generating workflow testing tips.
Compatible Testing Services
LifeMonitor currently supports monitoring tests that run on GitHub Actions, Jenkins and Travis CI.
Registering your workflow through the LifeMonitor GitHub app
The LifeMonitor GitHub app can automatically register your workflow testing pipeline with the LifeMonitor service.
If you use a repository structure that follows best practices it should be able to automatically extract all the necessary metadata. If you want to use a custom repository structure then you’ll need to provide the app with the metadata required to create a Workflow Testing RO-Crate. It may be possible to do this by answering the bot’s questions through GitHub issues; alternatively, you can manually register your workflow.
Manually registering your workflow
If required, you can manually register your workflow’s test pipeline(s) with the LifeMonitor service (e.g., if your workflow repository is not on GitHub, or you need to support a custom repository layout).
Key Concepts
Manually registering your workflow testing pipeline requires creating a Workflow Testing RO-Crate (WTROC) file that captures the required metadata (e.g., where do the tests run?). The WTROC is a specialization of a Workflow RO-Crate. You can find an in-depth description on its dedicated page.
Not all entities defined by the WTROC profile are required, though the more metadata you include the better you will be able to use LifeMonitor’s functionality (i.e., some things can’t work if you don’t provide the required metadata). LifeMonitor requires the definition of at least the following entities:
- Main workflow: the workflow which is being tested.
- Test suite: a set of tests for the workflow.
- Test service: a software service on which the testing pipeline runs (e.g., GitHub Actions, your institutional Jenkins installation, etc.).
- Test instance: a specific testing pipeline which runs a test suite on a specific test service – i.e., an instantiation of a test suite.
erDiagram
    TestSuite }o--|| Main-Workflow : tests
    TestInstance }o--|| TestSuite : executes
    TestInstance }o--|| TestService : "runs on"
Instructions
- Create a Workflow Testing RO-crate. Various tools can support you in this – see Making a Workflow Testing RO-Crate.
- Your RO-Crate must define a test instance pointing to the build service you configured (which, in turn, requires you specify the test service).
At this point, you have to submit your RO-Crate to LifeMonitor.
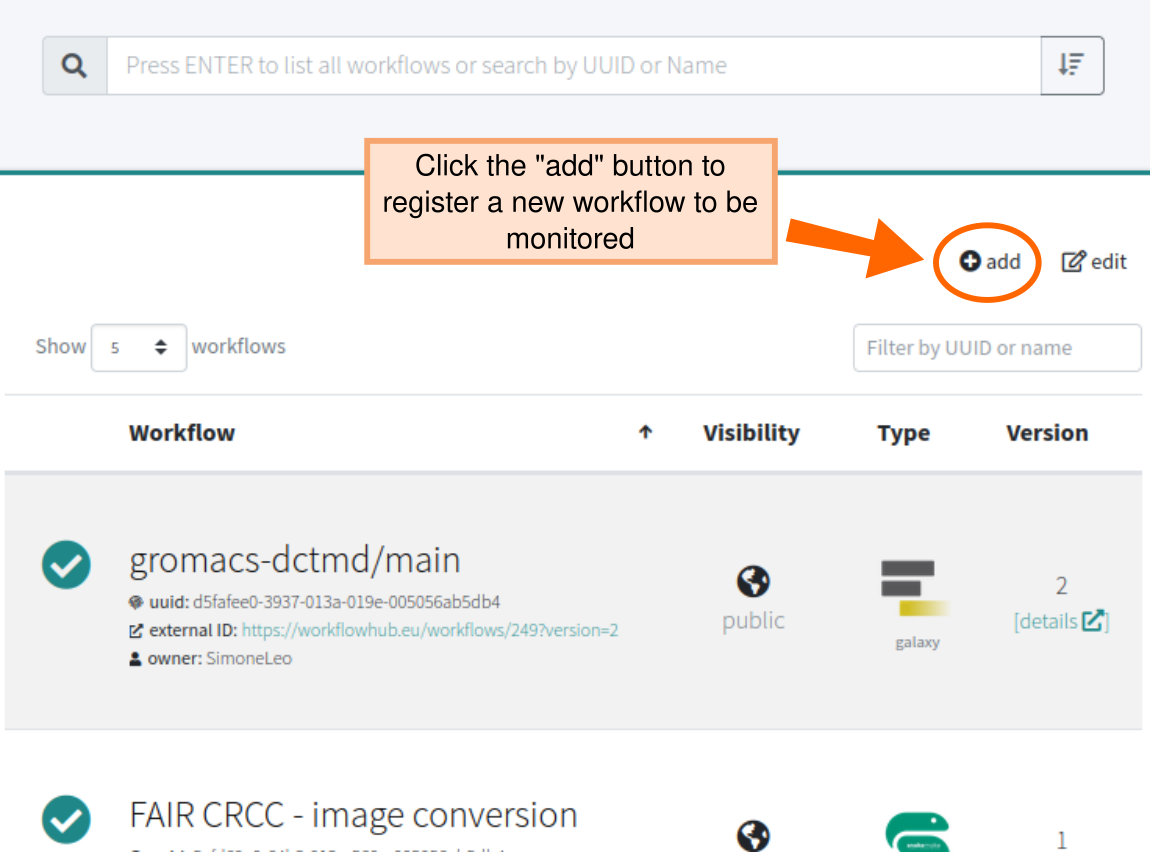
Navigate to the LifeMonitor dashboard and make sure you are signed in. If you’re not signed in, click the “Sign In” button on the top left and follow the instructions; more details on creating an account and signing in are available on the dedicated page.
Once you’re signed in, click on the “+ add” button just above the workflow list (see image below).
At this point you have a few options:
- Directly upload the Workflow Testing RO-Crate you created.
- Upload the WTROC somewhere (e.g., your workflow repository) and provide LifeMonitor with a URL through which it can download it.
- First register your workflow with WorkflowHub or WorkflowHub-dev, using the WTROC you created. You’ll then be able to select the workflow from a drop-down list. In most cases this is the best option as it allows LifeMonitor to update the WorkflowHub entry when it detects new workflow releases.
![]() If registering your workflow from the WorkflowHub registry, you
should authenticate with both LifeMonitor and WorkflowHub with the same
identity (e.g., use your GitHub or WorkflowHub identity).
If registering your workflow from the WorkflowHub registry, you
should authenticate with both LifeMonitor and WorkflowHub with the same
identity (e.g., use your GitHub or WorkflowHub identity).
The wizard process is explained in more detail in the following subsections.
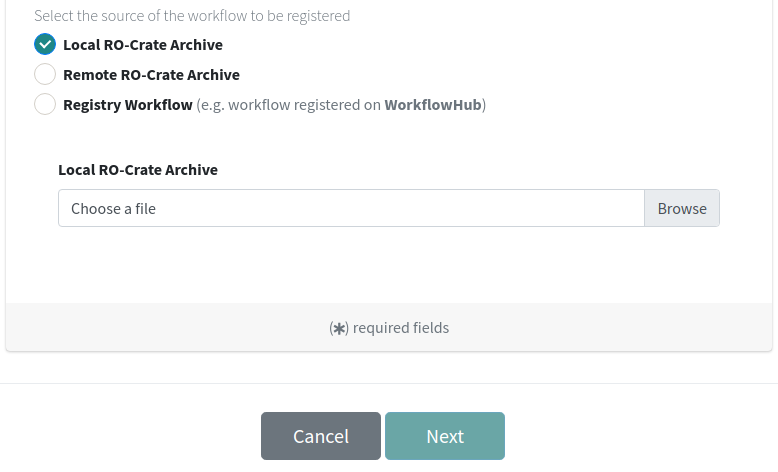
Registration via direct WTROC upload
By selecting the “Local RO-Crate Archive” option you’ll be able to specify your
local RO-Crate file to upload. You must upload the full zip RO-Crate
archive, not just the json metadata file. Click on “Browse” to select the
zip file from your local file system, then click on “Next”:
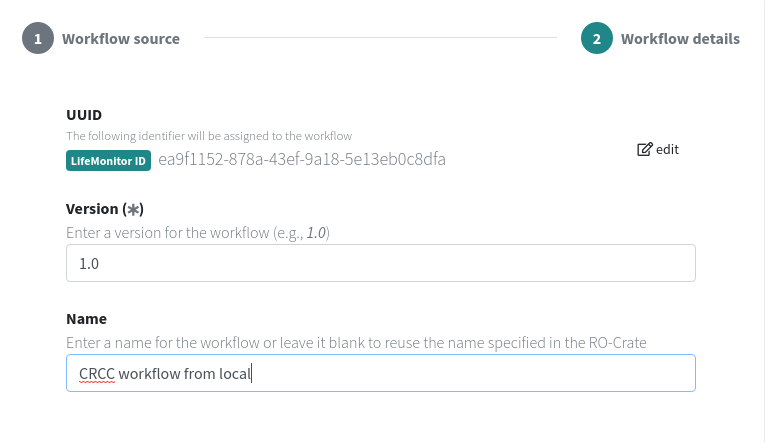
At this stage, you can specify a version and a name for the workflow; if you don’t specify these, the version will default to 1.0 and the name will be retrieved from the RO-Crate metadata. Finally, click on “Register” to complete the process.
Registration via remote WTROC download
The “Remote RO-Crate Archive” registration option is similar to the local archive registration, with the only difference being that instead of uploading a local zip file you’ll be specifying a URL from which LifeMonitor can download the file.
LifeMonitor supports retrieving the archive only via HTTP and HTTPS. If necessary, under Advanced Settings you can specify an authorization header to be used to access the archive.
Registration via workflow registry (i.e., WorkflowHub)
By selecting the “Registry Workflow” option you can register your workflow after having already registered it with WorkflowHub (or other compatible registries).
In most cases, this is the best approach as it allows LifeMonitor to connect its workflow entry to the WorkflowHub record. This lets LifeMonitor query WorkflowHub for metadata and, should you decide to install the LifeMonitor GitHub app in the future, it allows LifeMonitor to be configured to update the WorkflowHub entry when it detects new workflow releases in your repository; if you installed the LifeMonitor GitHub app from the start, on the other hand, it could also take care of registering your workflow with WorkflowHub).
If your workflow is not registered in WorkflowHub yet, follow these instructions to submit it.
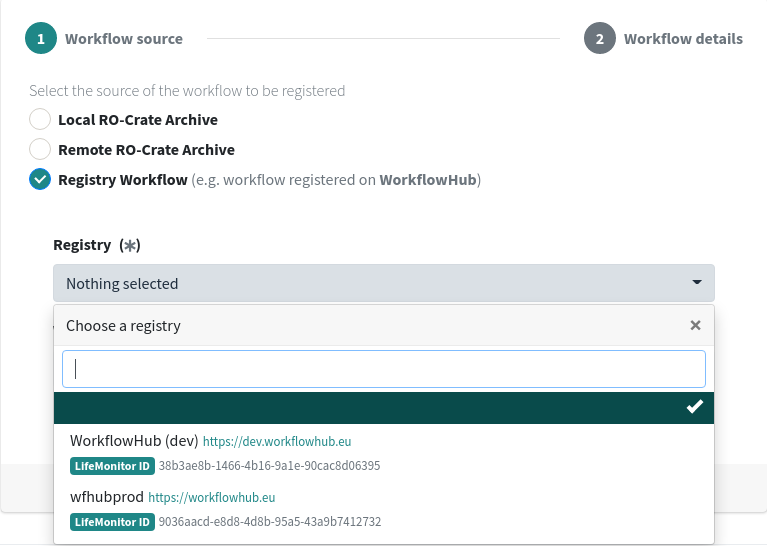
On the LifeMonitor workflow submission form, choose the appropriate WorkflowHub instance from the “Registry” drop-down menu (i.e., development or production – note that not all of them might be available depending on the LifeMonitor instance):
Then click on “Workflow” to choose a workflow (start typing in the text box to narrow down the possible choices). Assuming you’ve logged in to LifeMonitor via WorkflowHub, you should have access to all your workflows plus any public workflows. If you’ve just registered your workflow with WorkflowHub and cannot find it in the list, try logging out of LifeMonitor and then logging in again.
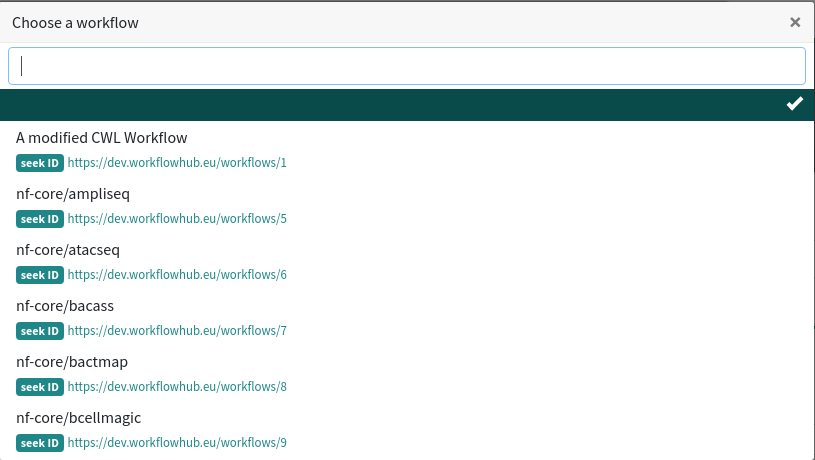
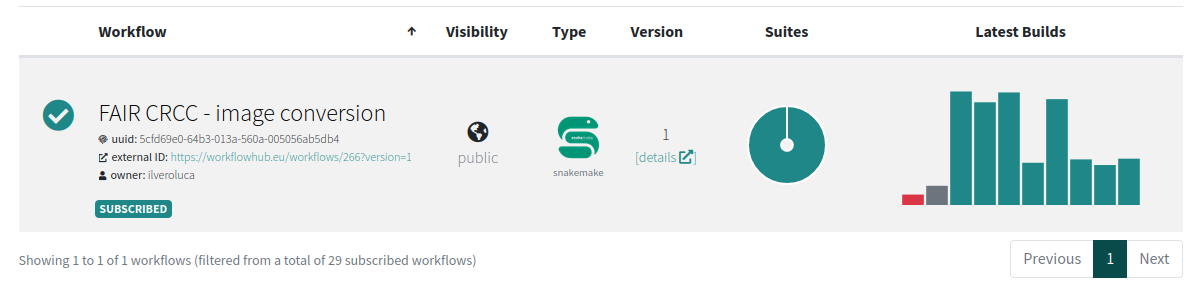
You can choose any workflow, but LifeMonitor won’t have anything interesting to show if it’s not coming from a Workflow Testing RO-Crate. Assuming you’ve already registered your WTROC, pick that workflow from the list. Similarly to other registration types, you will now have the option to choose a name for the workflow. When you’re done, click on “Register” to finish. If all went well, the new workflow should show up on your dashboard.
Changing the visibility of your workflow
By default, after registering a workflow, its visibility will be private, i.e., only the submitting user will be able to see it. To make it publicly visible, click on the “edit” icon at the top right of the workflows table, then click on the “change” button that appears in the “Visibility” column: you will be asked to confirm your choice, then the workflow will become public.
Notifications
LifeMonitor can notify you – within the application or, optionally, via email – each time a test instance changes state, i.e., from passing to failing or the other way around.
To access notifications within the application, click on the bell-shaped icon in the top-right corner (note that it appears only when there are new notifications to show):
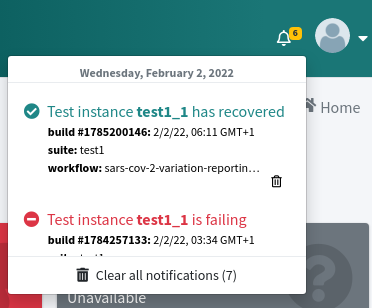
By clicking on an event from the list, you will be taken to the corresponding instance in the dashboard. The panel also allows you to clear selected or all notifications.
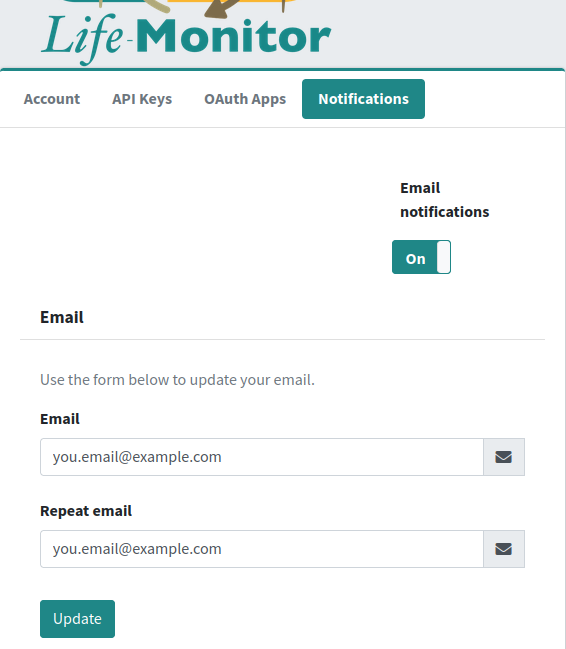
Enabling e-mail notifications
Point your browser to the notifications tab of the LifeMonitor settings. Enable e-mail notifications by setting the switch to on and configure your email address in the form. You will have to confirm the validity of the e-mail address by clicking on a validation link that will be sent to your e-mail inbox.
Next steps
Check the description of the LifeMonitor dashboard.